Designing Your Packing Table
While all packaging tables are similar in function, every packaging bench is
unique to its own set of issues. Sometime even within a packing and shipping
department, the workstations vary because of the size and scope of the packaging
operation.
The following information will help guide the process of designing
a packing bench model.
6 Steps to Designing an Efficient Packaging Station
- Write a job description for your packaging bench.
- Determine a workflow pattern for the packing table.
- Create a plan for integrating the packaging workstation into the
material handling system.
- Make a detailed list of equipment and materials to be stored at
the pack bench.
- Document the packing procedure and strategy.
- Design a packaging bench model.
It is a common error to focus the packing workstation design solely
around the storage of supplies. Maximized efficiency comes from integration
of the pack station into the company’s order fulfillment and material
handling systems.
Looking at the order fulfillment plan, from the point of view of the
packaging function, creates additional efficiency and productivity by
reducing extra movements, eliminating duplicated tasks, and handling
the product fewer times. It also determines logical ways to organize
the most important packing materials and supplies.

STEP 1. Write a Job Description for Your Packing Table
(Operational Overview)
It is very important to outline the tasks preformed at the Packaging
table. These tasks will be the same ones outlined in the Packers Job
Description and are usually some combination of the following:
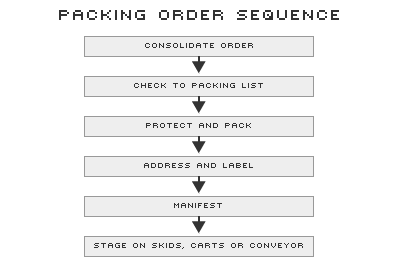
- Consolidate Orders
If this is one of the Packer’s tasks you must allow table space for
this process.
- Check Line Items to Packing List
This process requires space for writing or a computer.
- Quality Control
If damage is detected, what happens to the item? How will it be replaced?
How will the replacement process be initiated? Where will the partial order
be staged until the new item is received?
- Protect and Pack Function
What steps are necessary to complete the packaging process?
- Address and Label
When, where and how will this process be completed?
- Manifesting
When, where and how will this happen? What type of manifesting is required?
(UPS, FED-X, TRUCK)
- Staging and Transportation of Packed Orders
How will packed orders be staged? How are packed orders moved to shipping?
Select the combination of functions that apply to your packing bench
and proceed to Step 2.
STEP 2. Determine the Work Flow Pattern of All the Packing Table
Functions
This is an easy process that can be completed with a simple flow chart.
The chart sequences the functions in a logical pattern, for example:
Defining the operational flow gives you an overview, so you can consolidate
and condense all the functions into an ergonomic working model. Properly
designed, it will reduce wasted movements, eliminate extra handling
of the product and show you where to store all the equipment and supplies.
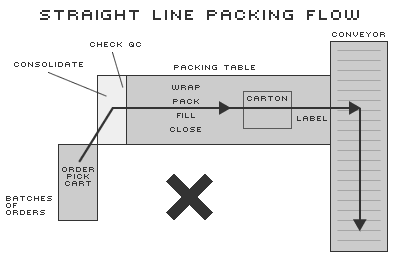
The most efficient packaging systems are usually arranged in straight-line
flow patterns. This allows the packer access to the orders on one side
of the table. A section of tabletop is allocated to consolidate and
check. The rest of the table top space is free to place items in the
box, void fill, close, label and manifest the box. Off table space is
provided to stage or convey the packed carton to shipping.
*In larger more complicated applications flow patterns get more complicated.
This issue will be discussed in it's own article.
After you complete the flow outline go to Step 3.
STEP 3. Create a Plan for Interfacing to Your Material Handling System
The Packing station has 3 primary interfaces with the company material
handling system.
- Bringing orders to the packer
- Refreshing supplies at the workstation
- Taking packed orders away from the workstation
Bringing orders to the Packing Workstation
In typical applications, orders are transported via boxes, totes,
skids, carts, and conveyors or in very large applications carousels
or sorting systems. It is most efficient when orders are delivered to
the packer in batches, so the packer does not have to move from his
workstation. The delivery system should be located next to the table.
To maximize efficiency, the packer should always be within easy reach
of a new order.
Refreshing the Packing Table with Supplies
All Packing benches need to be re-supplied with materials. If possible,
the packer should not have to stop while fresh supplies are placed on
the bench. In many cases, the restocking can take place from the back
of the table or by simply using portable supply carts, which can be
wheeled up to the table. Every application is different, but a creative
approach to this issue can save significant time.
Staging or Take Away of Packed Orders
Packed orders are usually staged on skids or carts or are transported
away from the work area by conveyor. Whenever possible, these systems
should be next to the table so the packer does not have to lift, carry
and walk the carton to the staging location. Many times the boxes can
weigh 40-70 pounds. Continuous lifting and handling increases the chances
for back and shoulder injuries. OSHA publishes a complete specification
on Range of Motion Standards. It is a good idea to become familiar with
the Standards to avoid problems.
The best solutions allow the packer to simply push the packed carton
onto the staging area. Spur conveyors, table height carts and conveyors
make this possible. Lift tables allow skids to be regulated to table
height.
Review your system to determine how to interface with your normal
materials handling functions. Document your plan so all of your employees
understand the process. When this is complete move to Step 4.
STEP 4. Make a Detailed List of Equipment, Materials and Supplies
to be Supplied at the Pack Center
 The
functional design of the packaging table is usually related to the type and
volume of supplies and equipment to be stored. Break your list into three parts. The
functional design of the packaging table is usually related to the type and
volume of supplies and equipment to be stored. Break your list into three parts.
- Machines
and Equipment
- Packing Materials and Supplies
- Miscellaneous Items and Personnel Items
Make sure the list is complete and detailed with number of sizes, measurements
of boxes and envelopes etc.
Rating the Supplies in ABC Stock Order
After completing the list, rank each item using the ABC concept. “A”
items are the supplies most frequently used. ”B” items are
less important and “C” items, are used infrequently. This
rating will help determine where each supply will be stored on the table.
STEP 5. Document Your Packing Procedures and Strategy
When the first 4 steps are completed you are ready to document your
Packing methods, procedures and strategy. This process is literally
a detailed walkthrough of the entire packing cycle. It is suggested
you simulate a mock up of the table, placing it next to the simulated
picked orders storage.
Step-by-Step walk through each function following the flow pattern
you created in (Step 2). The object is to move sequentially through
all the functions using a minimum amount of time, motion and material.
As you work through each phase in the flow pattern, refer to the list
of materials and supplies, rated in ABC order. It becomes clear where
each item should be located to keep pace with the packing flow. (Step
4)
Document each movement so it can be easily reviewed to find more efficient
methods. Finally let your workers be a part of the process. It is great
for morale and usually they are very innovative. Most importantly, if
they are a part of the process, they are less likely to fight it.
STEP 6. Designing the Packing Bench - How Do I Store All These Supplies?
The shear volume of Equipment and Supplies may be a surprise. Following
are some suggestions and rules.
- Rule 1. Do not use the table surface for storage, if possible.
- Rule 2. Incorporate ergonomic movement standards into the
design.
- Rule 3. Locate the “A” items in the easiest
to reach locations.
- Rule 4. Efficiently utilize the space surrounding the packing
station.
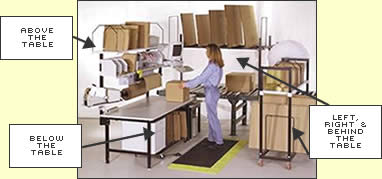
Material and Equipment Storage at the Workstation
There are five locations around your packaging workstation to store
and organize materials and supplies.
- Above the table
- Under the table
- Left side
- Right side
- Behind the Packer
Normally all the material cannot be stored in the front of the bench.
The “B” and “C” rated materials can usually
be stored below the top, on the sides or behind the worker. In multiple
workstation areas these materials can often be shared.
Above — The Table Storage
This is the prime ergonomic storage space and is usually used for
the highest “A” rated items and equipment.
Below the Table Storage
Under the bench storage is more difficult to reach. While ideal for
bulk storage like roll materials, sheets, and literature, it is not
ergonomically efficient space. Items that need to be viewed should not
be stored below the table. It forces the worker to step back, bend over
and awkwardly reach for material.
Left, Right and Back Storage
These areas are prime storage for “B” and “C”
items. Various carts, shelves, stands and other products are available
to maximize the use of this space. Don’t forget the space over
a conveyor. It is valuable.
As you decide where to store each item, determine what kind of table component
will be the most efficient. Modular type systems have advantages over custom
designed stations because they are generally more flexible. Choose accessory
storage that lets you store material in ergonomic reach zones.
Click to read new article "Maximizing Storage Space At Your Workstation"
Summary
Final Packing Bench designs usually end up with compromises that make
you choose between a series of desired features. If the bench is flexible
you can experiment to test for the best solution.
|